The subject of age or precipitation hardening comes up on Orchid fairly often when someone needs to harden an object that has been annealed and cannot be work hardened for any of a variety of reasons. Precipitation hardening is a better name for this phenomonon. It is not a universal process, it can only be done with alloys (not pure metals) and only certain alloys can be precipitation hardened. It has major uses in industrial metal production as many aluminum, magnesium, nickel, titanium and some stainless steel alloys can be hardened in this fashion. For jewelry work the main alloy that can be precipitation hardened is standard sterling silver. Argentium and a few of the other new proprietary sterling alloys can also be hardened this way but that is about it in regards to typical jewelry alloys.
Precipitation hardening occurs when small crystals of a second or impurity phase is allowed to precipitate out of solution when a specific heat treatment is done on the alloy. These small crystals tend to form at the boundaries between the other crystals in the matrix. These small crystals tend to act like little pins holding the larger crystals in position relative to each other. This prevents them from slipping and that makes the metal “harder” as it is more difficult to get the crystals to move when a strain like a hammer blow or bending the metal is applied to the metal. In affect it is like throwing sand into a ball bearing.
How does this work? First a quick bit of basic metallurgy. When you mix two or more metals together it is called an alloy. The alloy is a mixture or in metallurgical terms a solution. It is just like mixing sugar in water the sugar dissolves into the water making a solution of sugar and water. To visualize this the metallurgist uses a phase diagram like the one below. The vertical axis is temperature and the horizontal one is the ratio of the metals in the alloy: in this case silver and gold. The red dot on the left side is the melting point of silver; below that temperature silver is in the solid phase. Above that temperature silver is in the liquid phase. Over on the right most area of the diagram is a red dot indicating the melting point for gold with its liquid phase above that temperature and the solid phase below it. There is a pair of lines connecting those two dots. The upper line is the liquidus line and anything above that line is in the liquid phase and colored yellow on this diagram; the lower line is the solidus line and anything below that line is in the solid phase and shown in light blue here. In between those lines is an area where there is some solid and some liquid present at those ratios and temperatures. If you have ever melted sterling you have seen this area when the surface of the metal is all shiny but it has not collapsed into a puddle yet. However in a silver and gold binary alloy that is a very narrow range of temperatures and might not be visible.
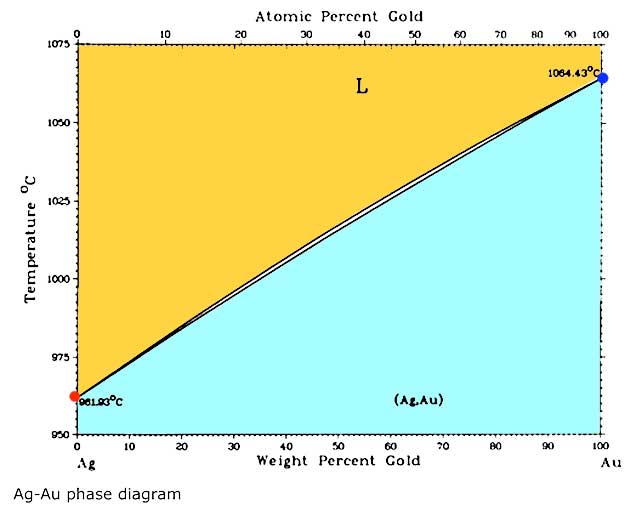
So what use are these diagrams? They have many uses but a real easy one is to figure out melting points. If you wanted to make an 18K green gold that was just silver and gold you could pick the 75% gold point on the horizontal axis and bring a line straight up and find where it intersects the liquidus line and then draw another line horizontally to the temperature axis and read what temperature that alloy would melt at, as in the diagram below.
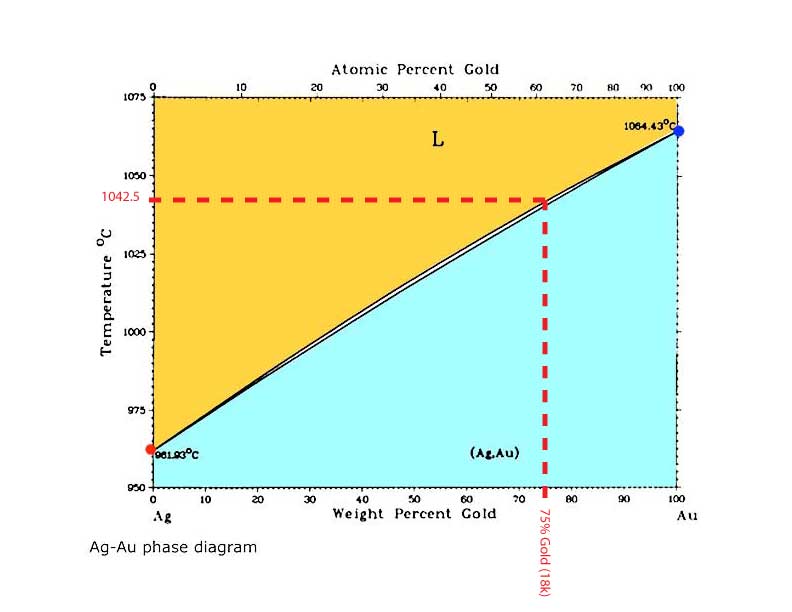 Calculating the Melting Point of an 18K Green Gold Alloy.
Back to Precipitation Hardening:
Below is a Phase diagram for silver and copper. It has a lot more going on in it than the gold silver one we were looking at before. Silver and copper are not 100% mutually soluble; they actually form a duplex alloy where there are two separate crystal structures formed by alloying silver and copper. The first one is the alpha crystal structure and can contain as much as 8.8% copper; it is in the pink area on the phase diagram below. The second crystal structure beta is mostly copper but can contain up to 8% silver; it is in the dark blue area on the diagram. Most of the time at room temperature any silver/copper alloy will contain a mixture of both alpha and beta crystals.However as the temperature is increased, you can have a single crystal phase begin to appear as long as you have less than 8.8% copper or more than 92% copper in the alloy; the boundaries of those conditions are shown by the pink and dark blue areas on the phase diagram. This mix of crystals is the reason that silver/copper alloys are so much harder than pure silver or pure copper. Because it does not have a homogenous structure a silver/copper alloy will not be as ductile or malleable as either of the pure elements or an alloy that forms a continuous solid solution like silver/gold alloys; this is what makes it “harder”.
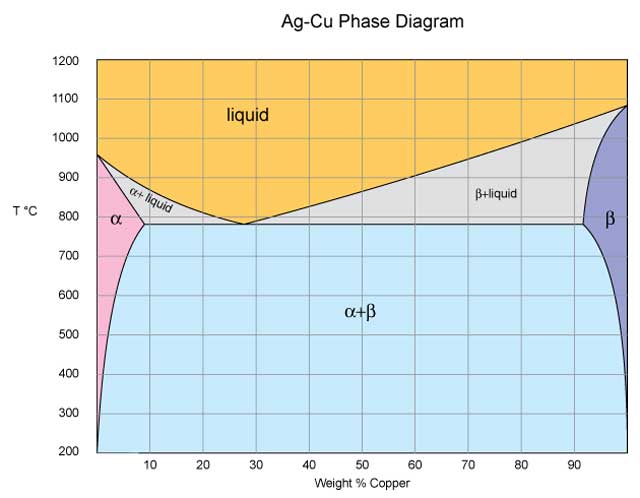
Just like our sugar in water analogy the amount of copper that silver can hold in solution changes as we heat it. However in metal alloys because we are dealing with solid solutions we can play a trick with this phenomenon. We can freeze the alloy in the alpha crystal structure if we don’t allow it time to precipitate those beta crystals as it cools. If we quench a silver alloy with 8.8% or less copper in it from the temperature where all the silver and copper are in the alpha phase we can lock the alloy in the alpha crystal structure. So if we heat Sterling to 725- 750 C we will end up with all the copper in that alloy in solution with the silver. If we then quench it we have preformed a solution anneal which is the first step in precipitation hardening. Now if we just let that piece of sterling sit around for a long time the copper would eventually precipitate out of solution and form beta phase crystals, but eventually could be a really long time (years) but it would make the metal harder as it happened. This is where the name age hardening comes into the picture. In the early days of developing aluminum alloys it was discovered that some alloys became harder just by lying around for a while. Because of aluminums low melting point this ageing activity happened in a relatively short time (weeks) at room temperature. This lead to the discovery that if one applied a little heat this “aging” process could be sped up, they began to call it artificial aging and eventually dropped the artificial part and it became age hardening. Once the mechanism was understood it was realized that the precipitation of some of the alloying elements into different crystal structures was acting to pin the aluminum crystal matrix making it harder.
So back to our sterling if we heat it to about 280C for a couple of hours the beta crystal structure will precipitate out as small fine grains mostly in the existing inter granular areas of the crystal matrix. So what you end up with is large alpha phase crystals locked or pinned by tiny beta phase crystals. If you do this right you can reach hardness numbers that are in the range of 120-140 HV compared to 56-66 HV in its annealed state. For reference the hardest you cam make it through cold work is 180 HV.
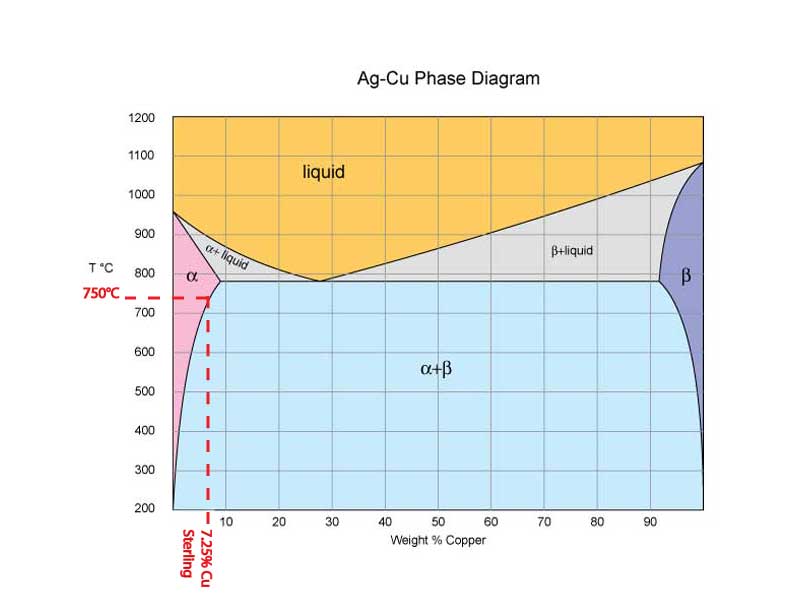
Most people don’t try to precipitation harden sterling because most silver solders melt below the 725-750C range so it is assumed there will be no benefit, but this is not the case. If you use hard or medium silver solder and heat the piece to 700C and then quench, you will still get significant hardening after aging, in the range of 110-120 HV.
Congratulations if you made it through all this.
Jim
{ 0 comments }
Latest posts by James Binnion (see all)
- Precipitation (Age) Hardening Sterling - January 2, 2013
- Copper and silver rings may not be such a good idea. - November 23, 2012
- A (K)new concept in jewelers saws - December 31, 2009