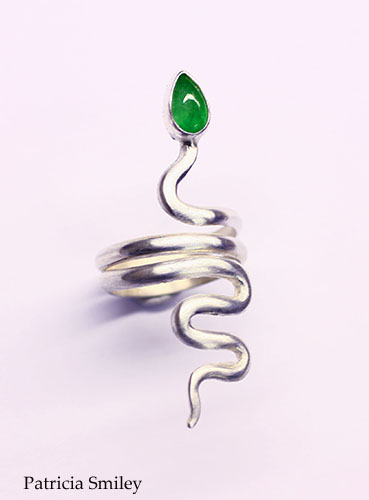
Emerald and Sterling Silver
Congratulations to our latest Student of the Week- Patricia Smiley. I have been teaching this project to students for years but Patricia’s version turned out so beautifully it inspired me to turn it into an official school project. Let’s go over some of the techniques Patricia used to make it so beautiful.
It’s best with a piece like this to start with a longish piece of sterling half round. Six inches is the minimum, eight inches is better. Too short of a length makes it more difficult to manipulate. Start 1/2 to 1 inch at the tail end and taper your wire well. Remember that the beauty of the ring is in it’s curves so don’t rush through your sanding and bending of the neck or tail. They will largely determine the success of your piece. The other really key element of this piece is how you set your pear shaped stone. I have noticed over the years that students tend to ovoid the point, saving it until last. When setting any shaped stone with corners, it is vital to set the corners first. Any spare room must be moved away from the point immediately. If the point is saved until last, extra metal is moved toward the point , resulting in a sloppy looking finish. It’s extremely difficult to correct at that stage and it will never look as good as it could have. As you can see, Patricia avoided these pitfalls and did a gorgeous job on her ring. The snake is an enduring icon of beauty and Patricia did it justice. Well done!
jeanettecaines
Latest posts by jeanettecaines (see all)
- Progress on new project with The MMA - April 14, 2017
- Exciting new project with The Met - March 25, 2017
- Is Your Pickle Contaminated? - August 31, 2015

{ 2 comments… read them below or add one }
We use a Number 2 file and then sandpaper to blend. The tapering is done before any bending is attempted.
Bravo! Love these explanatory articles!
How does one taper the tail end? I’ve wondered this when looking at pieces that appear to be made of wire.