really love to watch them roll -John Lennon
Some of my work requires a lot of sanding, especially to get good flat planes. I used my monster lathe with a flat disk on there for a lot of the sanding previous to this project. Since Ill be getting rid of that lathe, it was time to build a new piece of equipment.
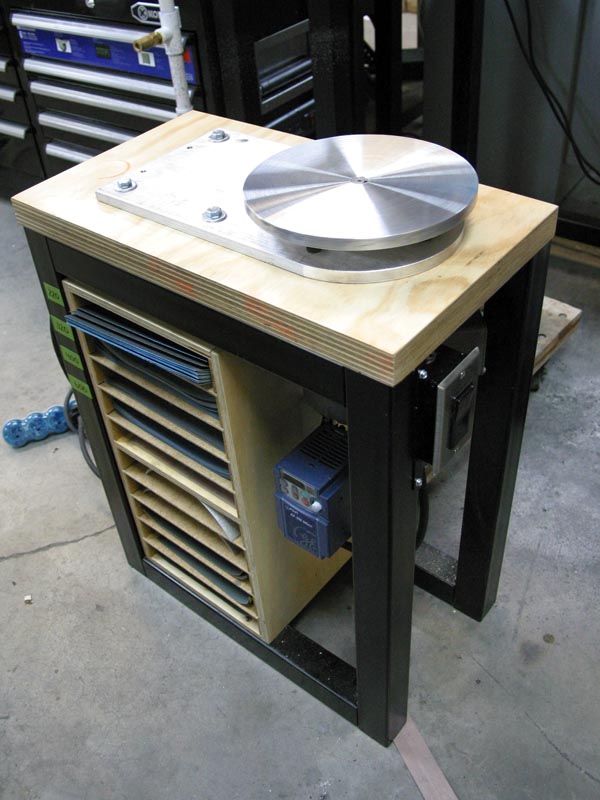
This is my new variable speed disk sander, much like a flat lap, but it uses standard sheets of sand paper (wet/dry) to be attached to the disk via spray adhesive.
Beaumount Metal Works actually builds a machine like this for $825. Primarily used for metal work, they also sell components to make your own. I purchased the Flat Disk, and Mounting Plate from them for this project. Both came in around $160.
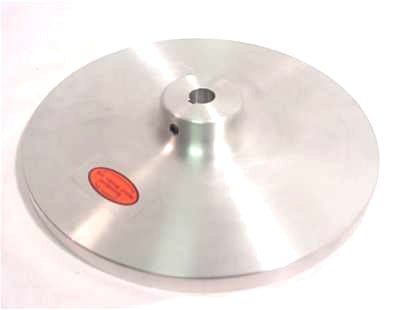
Disk shown upside down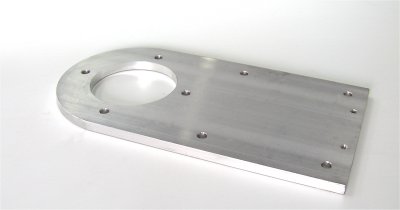
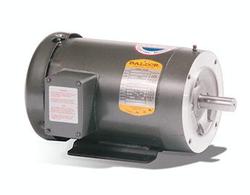
From there I sourced a 1/2hp 3 phase motor from eBay, if your lucky you can score one for well under $100 shipped. It must be a 56C frame style for it to bolt up to the mounting plate. In addition, it must have a 5/8″ shaft for the disk to mount to. The motor I chose has a max RPM of 1725, which is more than enough for the sanding I do.
Why a 3 phase motor you ask? Well, you can power a 3 phase motor using a standard 115V household outlet by using a nifty device called a Variable Frequency Drive (or VFD). There are tons of VFD’s on Ebay, and you have to match the VFD with the motor. In this case Im using a 1/2hp motor, and powering it with 115V. You can also power this with 220V if you so please, but getting the right VFD is critical. The BIG advantage of using a VFD is the ability to vary the speed at which the motor runs…therefore making it a variable speed sander. These typically sell from $100-$200.
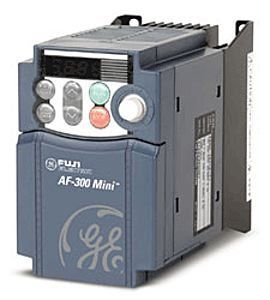
Above is one that I used…as stated, there are a lot out there. You can always buy one that is rated for more horsepower than your motor, but not the other way around.
The base for the motor was custom built for my purposes, but with the mounting plate, you can just bolt it to a bench and let the motor hang off.
Wiring is pretty straight forward. You’ll need 14/4 rubber encapsulated wiring (SOOW wiring is what its called), 8 feet is more than enough. I like this because it is stranded and super flexible. Its called 14/4 because there are 4, 14 gauge wires inside the insulation. You will also need a light switch.
Working backwards, wire the motor to the VFD, wire the VFD to the light switch, then finally the light switch to a plug so you can plug it into the wall. The light switch is inline to turn off the power to the VFD. If this is not present, the VFD will always remain on until you unplug the machine. I used the same 14/4 wiring from the VFD to the switch, and the switch to the plug…using only 3 of the 4 available strands.
A couple things to note: 1) Your playing with electricity, make sure you know where your breakers are at, and be safe about it. 2) Most 3 phase motors can be wired for either 230V or 460V, this is low and high voltage, you will want to wire the motor up for low voltage, follow the diagram that is on the motor. Typically, you are connecting the 4-5-6 wires together, and the 1-7, 2-8, 3-9 wires to the three power lines coming from the VFD. These wires will be labeled inside the motor, but pay attention to what the motor calls for.
And there you go, a weekend of kinda hard work pays off.
patpruitt
Latest posts by patpruitt (see all)
- Filing it away… - December 7, 2013
- DIY Pro Jewelry Bench – Redux - February 10, 2013
- 3M Radial Bristle Brush (wheel) – new found faith – - February 7, 2013

{ 1 comment… read it below or add one }
Great “How-to” Patt! Thanks for sharing that, Reading about some one’s real world experience building something like this is way more informative than craning over a stack of spec sheets and such.
You must log in to post a comment.