FLASK BLOW OUT
There must be something going on with the flask blow out described in the posts.
I have invested and cast flasks from 2 ½ inches to 6 inches for thirty years. I have had only two blow outs that I can remember. Something in the steps I take prevents blowouts or the casting gremlins are busy elsewhere when I cast.
The frustrating thing about casting is that what works for one may not work for others. Knowing this I risk telling what I do in investing and casting my flasks. Some of the techniques will probably leave casters thinking “NO WAY THAT WON‘T WORK.” However I have had success following these steps.
Maybe these steps will lead to clues as to why blow outs happen.
I try to follow the rule of allowing ¼ inches of investment above the wax for every 1 inch of flask diameter. Note I said I try to follow this rule. Some times on smaller flasks I violate this rule.

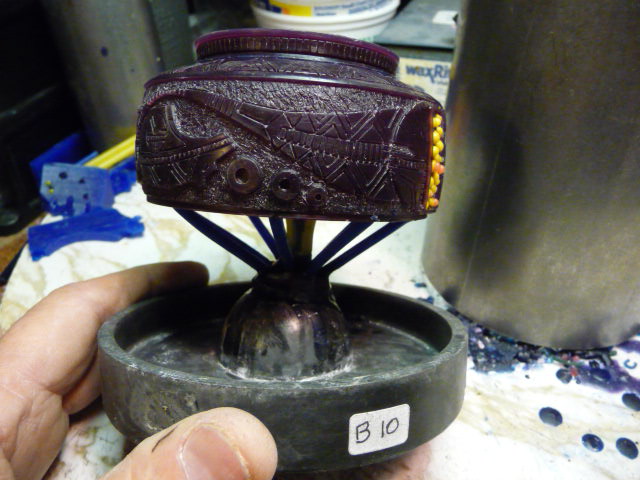
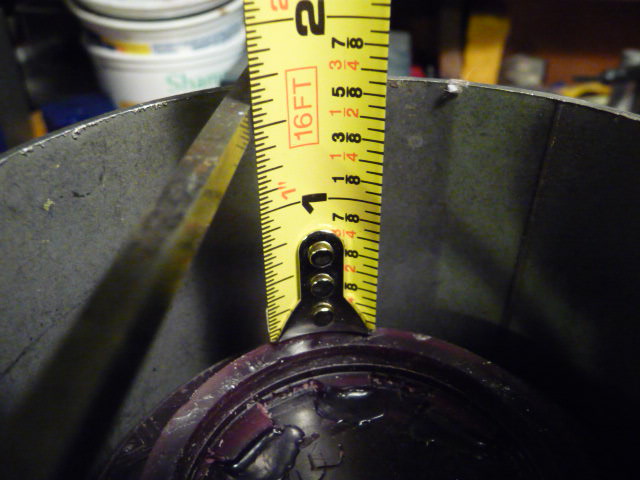

This wax is a little less than 3 ½ inches in diameter. It is placed in a 4 inch diameter flask. As indicated there will be about 1 ½ inches of investment above the wax.
I do not worry about the distance between the wax and the flask on most of my waxes as long as the wax does not touch the flask. On the larger pieces of pottery I try to provide at least ¼ of an inch between wax and flask. The only investment holding the top of the investment to the bottom of the investment is the ring between the flask and the wax.
I do not use tap water but use only water bought from local water treatment stores.
Both the investment and water are at room temperature.
I use Ransom and Randolph investment. I store the investment in my house. I have had investment sit for many months between usages.
Weight out 5 pounds of investment and measure the recommended amount of water. I pour the recommended amount of water into the mixing bowl. Pour the investment into the water. Mix the investment with an electric mixer on high speed for 1 min 15 seconds.
Place the mixing bowl under a bell jar and pull a vacuum. The vacuum is maintained for 1 minute after the investment pancakes.
Place the flasks to be invested on the rubber pad and pour the investment through a kitchen strainer into the flasks. I find the strainer will sometimes strain our improperly mixed investment.
Five 2 ½ inch flasks can be invested at a time.
Maintain a vacuum for one minute after the first bubble appears in the investment.
If all goes well I will have enough time to invest a second set of flasks with the remains of the first 5 pounds of investment. I try to complete all the investing within a seven minute period.
Let the flasks sit for three hours.
I scrape the top of the investment with a curved trowel. This gives a slight concave shape to the investment. I believe the vacuum will be more uniformly distributed across the entire face of the flask. The slight curve in the investment might, and I am just guessing, give the investment a little more strength.

My oven holds 16-2 ½ inch flasks on the first level. I will add additional flasks if they are short. The oven will handle flasks up to seven inches tall. The taller flasks should be placed in the center and front of the oven. There is a danger of overheating the heating coils if tall flasks are placed against the back and side walls. If I cast very large flasks I place them in the center of the oven.
 I scratch the flask number on the investment so that I can identify which flask id being poured.
I normally do not cast unless I have a full oven.
Place flasks in the burnout oven and increase the temperature from room temperature to 250 degrees and hold for 2 hours. Increase the temperature by 300 degrees per hour until the temperature of 1350 is reached. If the oven is really packed the oven may not be able to increase 300 degrees per hour.
I maintain the burnout temp of 1330 for 8 hours. I have found it takes 8 hours to completely remove all the wax in the full oven. Then cool the flask down to 860 degrees if silver is to be poured. The flasks are allowed to sit for at least one hour before pouring the first flask.
The silver is melted in an electro melt furnace at around 1370 degrees.
The flask is placed on the pad when the system is set to pull a vacuum. It might be safer to place the flask on the pad then increase the vacuum to the flask.

This sketch shows the convex surface of the investment.
Pour the silver.
Place the hot flask immediately on to a wax covered pad. Throw wax on the sprue and cover the flask with a larger flask then place a solder pad on top of the cover flask. This if my way of preventing fire scale on the silver casting. The process is better described in Orchids “Tips from the jeweler’s bench.”
Allow the melt furnace to stand for around 5 minutes before a second pour is made. This allows the upper ring of the graphite crucible to heat up to pouring temperature. If the ring is not heated up again before pouring the silver will chill as it flows over the ring.
I quench the smaller flasks in about 7 minutes after pouring and around 15 to 20 minutes for the very large flasks.
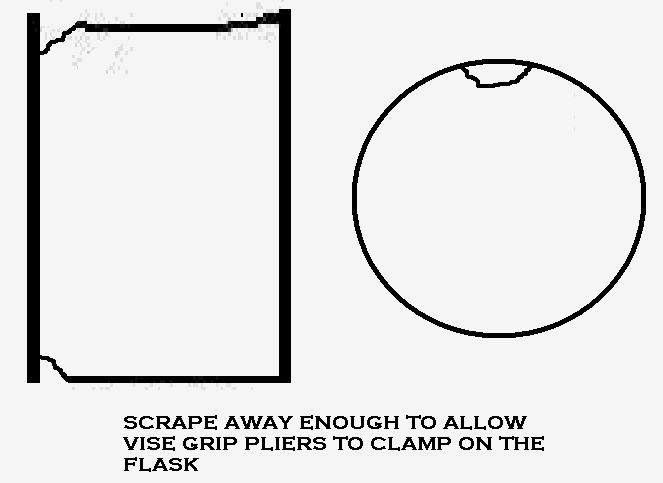
Note: The gripping tongs normally used to hold the flasks do not work well on the 4, 5 and 6 inch flasks. To solve this problem I scrape some investment away form the top and bottom edge of the flask so that I can grip the flask with vice clamp pliers. The flask is removed from the oven by clamping the pliers on the non sprue end. The flask is placed on a flat surface and the pliers are moved to the sprue end. The pliers are left clamped to the flask as the silver is poured. The flask and head of the pliers go under the surface of the quench water when quenching.
The wax with sprues described in this post weighted 59 grams.
The 3.5 inch diameter wax was placed in a 4 inch flask. That leaves only 1/4 inches between the wax and the flask. There was only 1.5 inch thickness of investment above the wax.
I have cast many large pieces of pottery with these dimensions without failures.
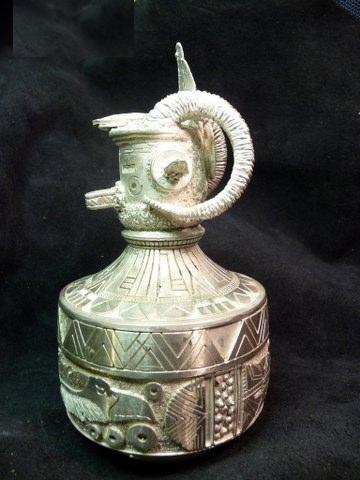
The finished casting with sprues and sprue button weighted 823 grams.
I have shown the casting soldered to the top part of the pot. The kachina is removable. Creation of the kachina is described in one of my blogs.
I have written a rather lengthy paper on vacuum casting. It is free to anyone who can receive an attachment on their e-mail.
Contact me on lees silver@cox.net
leessilver
Latest posts by leessilver (see all)
- CASTING PAPER UNDER CONSTRUCTION - October 30, 2010
- CASTING PAPER UNDER CONSTRUCTION - October 30, 2010
- PAPER NO 4 CREATING LARGE JUMP RINGS - October 15, 2010

{ 3 comments… read them below or add one }
Witchcraft, LOL. Well, with so many variables, it does seem a bit magical.
The soak time is set based on the amount of wax that I am burning out. I have not had complete burn out with a shorter time.
Many of the items are created with carving wax which does not melt readily out of the mold.
I have found that a mold temperature of around 860 degrees gives me the best castings. Hotter than that causes porosity in the castings. A lower temperature produced castings that are incomplete or not sharp.
All the items I cast are fairly heavy or small. I guess I would try a hotter mold temperature if I was casting filigree.
I read the correct temperature combination of the metal and mold can be determined buy the shape of the sprue button. If the top of the button is concave the temperature combination was too cold. If the top of the sprue button is convex the temperature combination was too hot.
I was told once that 860 degree mold temperature was too cold and that the mold temperature should be 1000 degrees when pouring the metal. I tried that and the sprue button blew up like a balloon. I cut the sprue button in half by my band saw and found the inside of the button was like a sponge.
I later learned the individual who told me my 860 degree mold temperature was too cold did centrifugal casting. The mold cools while the metal is heated.
I guess the best I can say about the whole casting process is that it is somewhat like witchcraft. What works for me may not work for others.
Good luck.
Lee
Very good post.
I don’t use vacuum to cast, but I was wondering a few things. I use the same investment, and I don’t let it soak in the heat for nearly that long. Do you do this because of the quantity of wax that you use or the quantity of flasks at one time?
Also, you allow your flasks to cool down. My understanding is that you cast when your flask is just 200 degrees below the melting temperature of the metal that you are casting. Of course I realize that most of what we do in casting is based on the experience of someone else, and a bit of it is superstition. It obviously works for you, but do you have problems with thin or filigree type patterns clogging?
Thanks for posting this, great info :o)
You must log in to post a comment.