Inspiration for my latest sculpture, “Family Excursion” started with a splinter of mulberry wood I rescued from my firewood pile a couple years ago. I could see that it had great possibilities, so I took it in, and from time to time would sand on it, and try to think about what to use if for. the wood has a feeling of movement and direction to it, with an off-center bend that allows it to rock, but also requires that the weight that’s put on it be balanced correctly. I finally came up with the slugs, because unlike other creatures I could have chosen, slugs are repulsive, but could be made to look cute. I like that contradiction.
The first step to making a slug is figuring out the shape to cut out of the metal. At first I thought the shape was simple enough I could just guess at it. Wrong. It’s actually pretty complicated the way the seams have to meet up at the head end, so I had to resort to making a clay model and using “dip seal” (see this post), and working from there. The first picture shows the clay model. Sorry I didn’t get a picture of the clay model coated with dip seal. Next is the dip seal coating cut at the intended seam lines and removed from the model. The next pictures shows it being spread out some. The dip seal pattern is then spread out as flat as possible on a sheet of paper and traced with pencil. This can be scanned and with computer and printer made any size desired.


After the blank is cut out and annealed, the antennae are formed over a stake, then the back is pushed out from inside on a sand bag.Next, the curvature of the body is formed over a stake with a raising hammer, then the belly curve on another stake with a planishing hammer.


Next is closing up the seams on the antennae and rounding them out. Then a view of the piece at that stage, and the seams having just been silver-soldered.


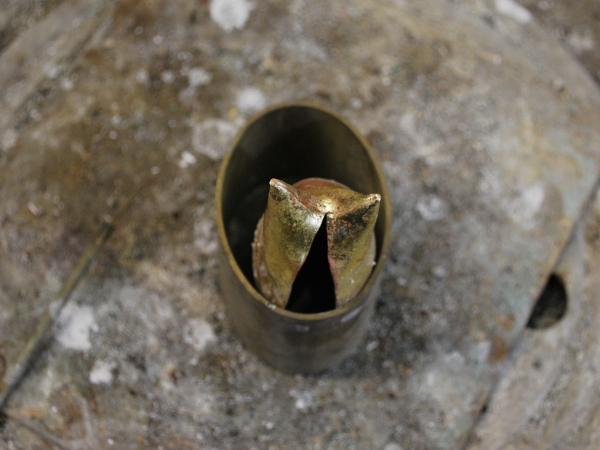
The slug was annealed again, and the main seam closed up as much as possible, which in this case was only the back part. The picture shows it after silver-soldering. It had to be annealed again to get the rest of the seam closed up. Then we see it with the entire seam silver-soldered, and pickled, and then with all the final planishing and polishing.


And finally, the finished piece, three views. The slugs are attached with stainless steel machine screws, two for each one.


shelbyvision
Latest posts by shelbyvision (see all)
- Making the slugs for “Family Excursion” sculpture. - February 8, 2012
- “Yes Man”, Hammer-formed brass sculpture, and hour-long video - December 14, 2011
- Homemade Immersion Heater for Large Pickle Tank - July 12, 2011

{ 4 comments… read them below or add one }
Nice blog u have well done
love the work…..
Wow, just stumbled across your stuff… amazing! I think you’ve answered my question anyway… You can use silver solder with brass? I want to make a chain but thought the silver may be too bright compared to the brass. Can you pickle brass?
That’s the cutest slug I ever saw!
Good process pictures.