Be it a story of love, loss or lore, folks have long used lockets to contain symbols of the precious in their lives. Building a locket is a special challenge for a metalsmith, as it requires the marriage of the metalsmith’s aesthetic and technical skills at the bench.

The recent completion of the Elizabeth Locket was a studio victory like many others – I loved the piece, and the clients were pleased as we worked through the maker/wearer collaborative process despite delays along the way. The client wanted a locket as a gift for his wife to contain an image of their baby girl. At his suggestion, I met with his wife before approaching the bench – who would become the wearer of the piece – to discuss particulars of the design and the functionality of the piece. As we discussed the project, we decided the locket would be fairly large, rest well against the body, be versatile as either a pendant or a brooch, be feminine but contemporary, and of course contain an image of the baby.
Our original plan was to etch an image of the baby into a piece of copper, which would then become the interior of the locket. One of the technical rules of metal etching is to use line art, or images that are made up of black and white, with no shades of gray. I have challenged this rule in the past as I have long been fond of the shades of gray.  Call me a rule-breaker, but I have had success in the past with etching photographic images (full of shades of gray) into metal by converting the images to halftones (as in non-digital newspaper printing) and using a heat transfer resist. Those childhood experiences of using a magnifying glass to see the dots in a newspaper photograph must have made an impression on me.
So I proceeded with the image of baby Elizabeth and converted it to halftones of various levels of contrast. I prepared several resists in various resolutions to see which etching was the most effective. I transferred the resists to properly cleaned, oil-free 22-gauge copper sheet, and proceeded with agitated immersion in ferric chloride for the etching. After several etched pieces, which I decided were not acceptable, I began to consider other ways to present the baby’s image. The halftone images etched, but I was unhappy with the level of detail. I could easily create an image that read visually as a baby, but it didn’t necessarily read as baby Elizabeth. So, since the piece was commissioned by Elizabeth’s parents and capturing her likeness was a primary objective, it was time to make and move to Plan B.
I’m no stranger to Plan B in the studio. Years of jewelry repair have conditioned me well in correcting broken situations. I decided to go with a more functional approach by using a photograph in the locket, and I chose to explore my collection of vintage (but never used) watch crystals to protect the photograph. From my set of crystals for pocket watches I chose a crystal size that I had in multiples in case of a fracture. (You cannot purchase vintage pocket watch crystals at the average corner market.)
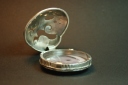
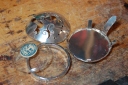
 The next steps were to build the locket itself from sheet and wire sterling silver. From a piece of 20-gauge sterling sheet, I cut out the backing first, including projections from the circle to become the hinge knuckles and tabs. The tabs would later be scored, folded perfectly perpendicular, soldered for strength, and shaped to hold the piece together. Moving from back to front, the piece would include five layers: tabbed backing, photograph, watch crystal, a sidewall (like a hudee ring around a retro sink), and the hinged front.
I had sketched out six or eight different designs for the piercing on the front of the locket. The client and I agreed that it should provide a slight glimpse to the baby’s image inside, without revealing too much. She chose a pattern with a combination of swirls and circles, that would create an artistic contemporary feminine mood. I carefully drilled pilot holes, inserted my saw blade, and pierced the design into a circular piece of 18-gauge sterling silver sheet. The next step was to dap the circle into a domed form.
In the next moments, as I faced an outcome different from my expectation, I opted against Plan B.
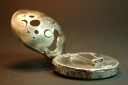
I placed the pierced circle into the concave dapping block, and proceeded to strike the convex punch to encourage the pierced sterling to conform to the forms surrounding it. I could feed the metal moving, so I proceeded. But, when I removed the punch and retrieved the pierced sterling, something was not as I expected it to be. 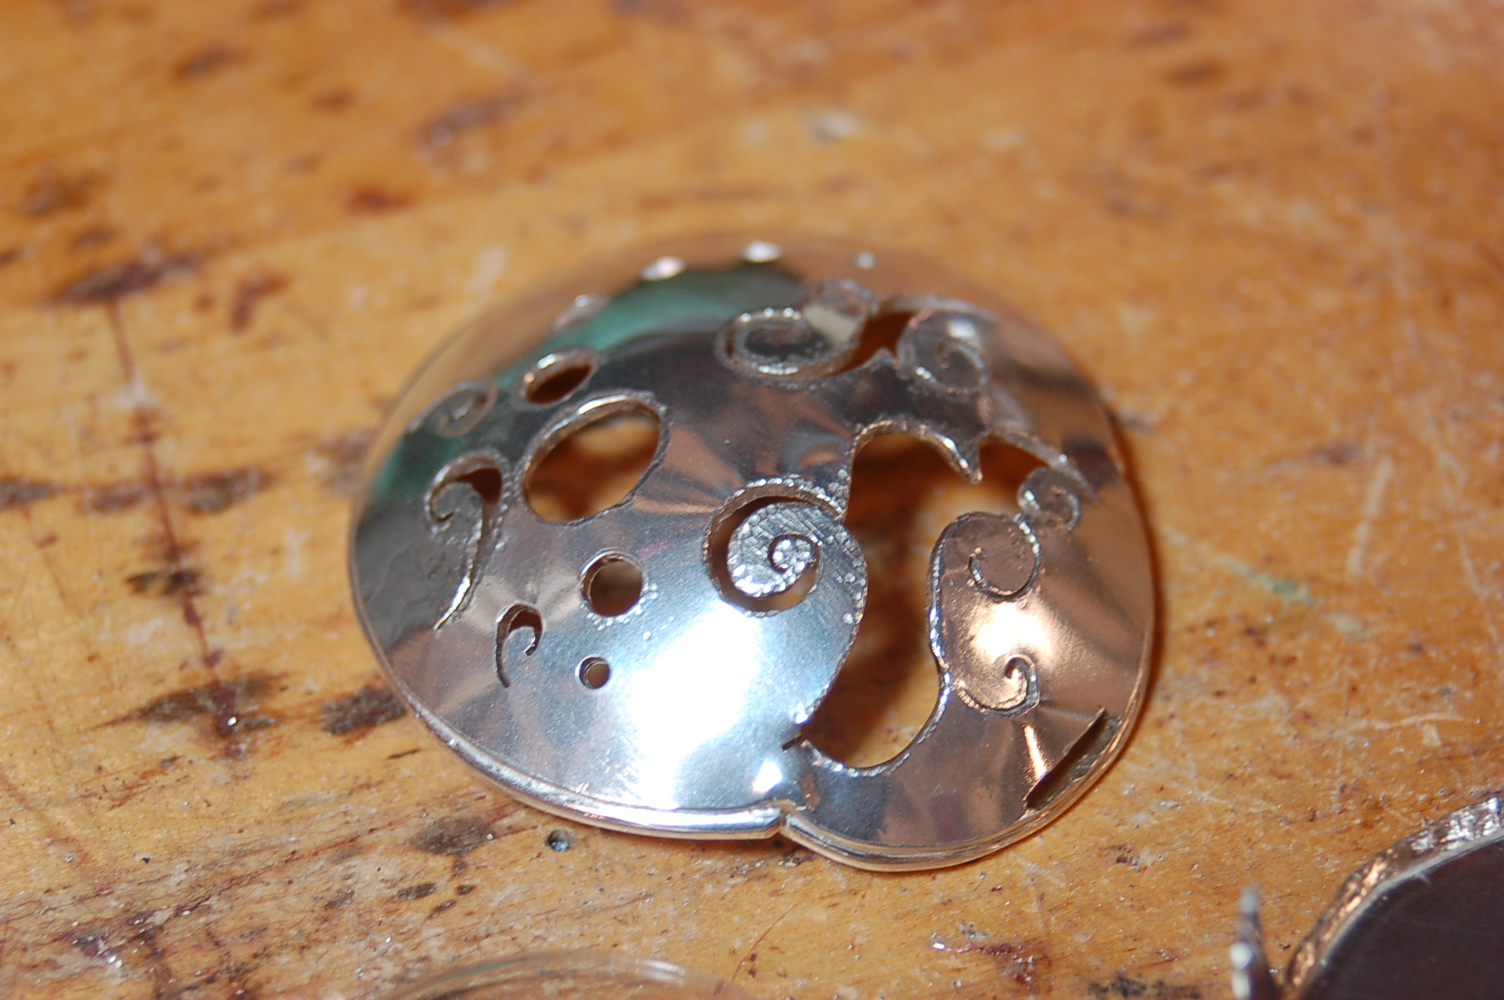 One of the thinner areas of the piercing had broken during dapping, so the opening had spread open and the overall form was no longer a circle. This result was neither my intention nor my expectation. I held the metal form in my hands, sat at the bench, and discovered that it had become much better than I had ever imagined it.
This time, there was no need for Plan B.
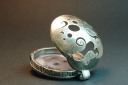
The larger-than-designed opening was delightfully lively. With some minor tweaking, it became a bird-like form, with a sense of genuine whimsy and celebration. The bulge to one side of the circle became the perfect place to build the hinge, and create a sense of aesthetic inclusion for the mechanism. I built a rim around the perimeter to create a sense of substance, chased the piercings to add some texture and definition, planned the positioning and functioning of the hinge mechanism, and oxidized all the parts.
 Bringing all the layers together to test the fit, it was important to me that everything fit perfectly. In particular, the crystal needed to fit securely – not tight enough to create pressure on the glass, but also not loose enough to result in a rattle. Rattling was the problem I encountered, so I forged a slight upset along the underside of the sidewall rim, which worked on the first pass to alleviate the rattling without creating tension on the crystal.
 I called the client to invite her to visit the piece in process, and to talk with her about the lack of the etched image and the usage of an actual photograph. We agreed that a black-and-white photograph would suit the piece best, so she provided that. It was time for assembly.
I used to expect the moment when all the parts are assembled to be some kind of hallelujah moment – when my metaphorical choir breaks into the Hallelujah Chorus to celebrate the culmination of the piece. It wasn’t quite like that, or, if it was, no one heard it all but me.
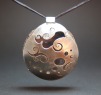
Still, the piece came together well. The hinge was also the bail, the pin stem on the back was adjusted for ease, and the Elizabeth Locket was complete.


gingermeekallen
Latest posts by gingermeekallen (see all)
- Empty Space - May 18, 2010
- Celebrating the Muddled Middle - May 6, 2010
- Change of Venue - April 7, 2010

{ 2 comments… read them below or add one }
Thanks for the tip, Kerri. The undercut was never a problem for me before, but I wasn’t so concerned with the photographic likeness before either. I will look into using electro-etching.
Thanks for your kind words.
Ginger- love the locket- and I have experimented with halftones as well- the dipping into acid etch will undercut or skew the design as you know- I have had sucess with a quicker etch by electro-etching an image. The half-tones come out well, and the depth of etch is controllable to a finer degree with no undercut. You may have better control and a finer resolution with this process and with using a blackening agent you will achieve the “greys”… just a thought- liked the pendant nonetheless- I especially favor the texturing and hold-down for the spacer ring. Nice work!
You must log in to post a comment.