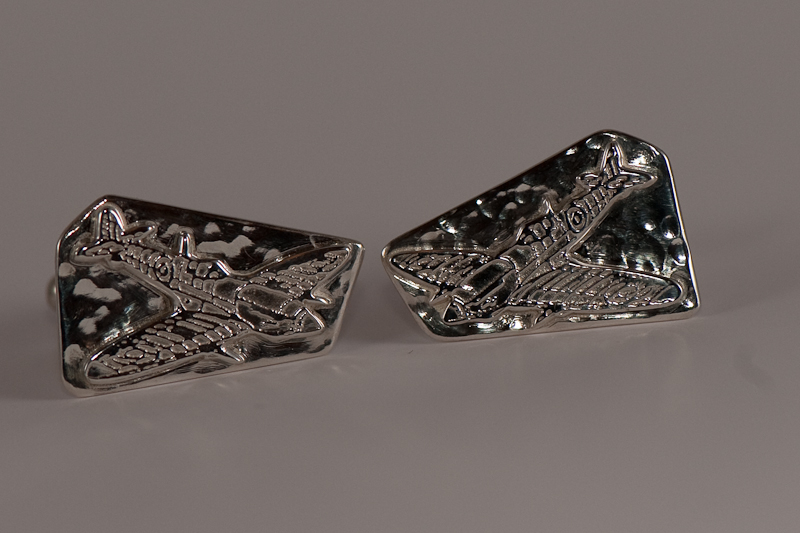
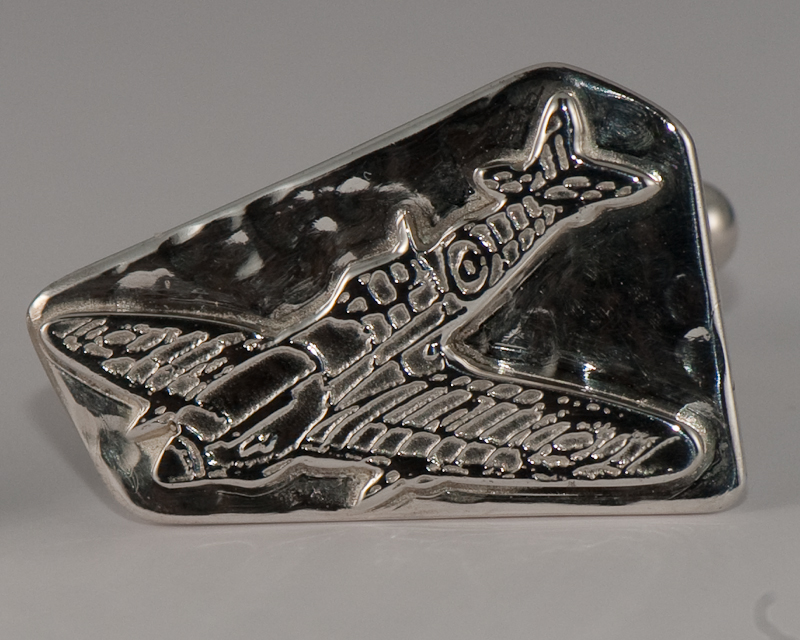
Argentium sterling “Spitfire” cufflinks
My main supplier has recently started carrying Argentium sterling, so I decided I had to give it a try. I had an order for a pair of “Spitfire” cufflinks for a customer who has a relative in the RAF.
The image was printed onto PNP Blue etching transfer sheet, which was then transferred to the Argentium. I used ferric nitrate for the etching process. When I was happy with the result, the silver was cleaned up and the designs saw pierced using a jeweller’s saw. After finishing the edges of the aeroplanes using files, I fused them onto another sheet of Argentium sterling, to which I had given a hammered finish. The cufflink findings were then soldered onto the backs, before polishing and then hardening in my domestic oven. Discolouration was then pickled away before a final quick buff.
Here are a few pictures of the finished result. Photographing them was a whole different learning curve!

I was HUGELY impressed with the Argentium and in particular how easily it fused, and that I didn’t have to contend with any firestain! I did have a couple of problems making the cufflinks though, one to do with Argentium, and one self induced. The self induced problem was that I cooked the steel springs in one pair of cufflink findings, and so had to cut them off and solder on a new pair using a lower melting point solder. Lesson learned that I can’t always use my favourite, hard solder for everything. I used easy, as the medium solder I have does not flow nicely and has a texture like crunchy peanut butter when it melts! I must find some decent medium solder.
The other problem I had was that the Argentium didn’t seem to want to take a polish as easily as standard sterling silver. I’m presuming this is because of the layer of germanium oxide, which is harder than sterling silver. If anybody has any suggestions for a suitable polishing compound for Argentium sterling, which will produce a high polish, I’d be very interested. I was not happy that I couldn’t get into all the nooks and crannies and get rid of the “frosted” look, so in the end, I used a steel burnisher to put a shine into those areas. It worked pretty well, but when louped (and in the pictures above), you can see some scratches as a result. Fortunately, they are not visible to the naked eye in real size. The customer was over the moon with happiness at how they turned out, and will be placing another order. I will be using Argentium again soon – it’s great!!! Oh and this etching lark is a whole lot of fun!
helen hill
Latest posts by helen hill (see all)
- Latest commission – Arabic cursive “Angel” pendant - November 7, 2009
- Design similarities - March 11, 2009
- My daughter’s got the jewellery bug! :-D - February 21, 2009
{ 8 comments… read them below or add one }
Hi .t,
One of the features of Argentium sterling is that it can be heat (precipitation) hardened in a domestic oven. If I remember rightly, I put it in at 245 degrees Celcius (my oven’s highest setting) for 2 hours. It brings the germanium oxide to the surface, making the piece harder than regular sterling. Make sure your oven is meticulously clean though, as it’s a nightmare cleaning off any grease residue that gets deposited on the piece!
Happy etching!
Helen
hi helen,
they look great and they are something i wanted to try for a long time. etsching and cuflings. i will order some findings from cookson. i am very happy with their supplies.
i would like to ask you one question. what do you mean by hardening in domestic oven. how does it work and how do you do it. will you share?
i have recentrly learned how to harden studs by twisting and that has greatly improved and speeded up my studs making.
carry on the great work,
.t
Thanks for the compliment and the recommendation Kerri. Ronda Coryell more than likely identified my problem today though. She suggested that I was bringing up the germanium oxide layer too early, by only fluxing the joint to be fused, rather than protecting the whole piece. So hopefully next time I won’t have the same problem. Agentium’s inventor Peter Johns said I shouldn’t be having such problems using the compounds I’m using, so what Ronda said makes perfect sense. I want that germanium oxide layer, just at the right stage in the process.
Thanks again Kerri.
Helen- liked the spitfires! How about a series of WWII mens-lapel pins! The attle of Britan in Silver… HA! Anyway- I have had good results witha product called ZAM for getting the harder crust off argentium in my short-experience with it… I have worked only 2x with Argentium but the ZAM is a bit more aggressive in its grit than rouge, but softer than tripoli- and brought about a lustre that I enjoied. I was introduced to ZAM through a steel artist locally who uses it for aggressive pre-polish before final machine treating… Just a thought.
-Cheers from USofA- Kerri
Thank you VERY much Jeff – what a lovely thing to say! I’m never happy with what I make though, so I just have to settle for “good enough” so that I’m not working on something for ever. I have to try and put myself in the customer’s shoes and ask if they would be happy and if I think they would, I’ll stop, deliver the piece and move onto the next thing and try to improve. Thanks again Jeff.
Helen,
You are getting damned good
jeffD
Hi Beth, thank you. The ferric nitrate does etch beautifully, but even though I suspended the pieces upside down, I still had the problem of the etch clogging up with sludge!
I usually use these cufflink findings:
http://www.cooksongold.com/Findings/Silver-Assembled-Cufflink-Fitting-Round-Bar-With-U-Arm-Plain-prcode-NVU-101
However, although the website says they are in stock, when I ordered them, I was told they are out of stock for a while, so I had to order an alternative. I’ve ordered the following:
http://www.cooksongold.com/Findings/Silver-Cuff-Link-S-arm-Assembled-Heavy-Wt-prcode-NVU-S01
I’m not sure how well they’ll work out, but I didn’t like any of the others. I’ve found that the lightweight ones fail so easily – the end caps can come off and it doesn’t take much to overcook the spring, etc, so I thought I’d try some heavy weight ones instead. I would have bought the U arm heavyweight ones, but it says “expected”, and I need them now! I’m still waiting for delivery though.
Enjoy etching your silver when you get the chance – it’s such fun!
Helen
Lovely – glad your etching went well! I’ve got my ferric nitrate, and can’t wait to have time to try some. So far I’ve only etched copper.
What findings are you using?
You must log in to post a comment.