By
Lee Epperson
The build up process is a technique where wax is layered upon layers of wax. The design is slowly built up by this layering on of wax.
This paper will describe one of many methods used in the wax build up process. With practice the artist will develop textures and styles of their own.
The advantage of making a model out of wax is that you can get textures that can not be obtained in any other way.
BUILD UP METHOD
In the build up method of making a wax model the wax is melted onto a tool. The melted wax is then drawn on previously built up wax. Wax is continually layered on the wax model until the desired shape is reached. This process allows many shapes in design and texture that can not be conveniently made by any other methods of model making.

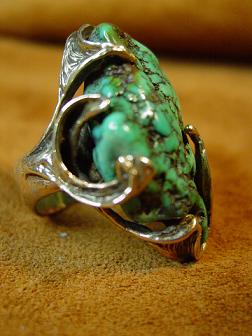
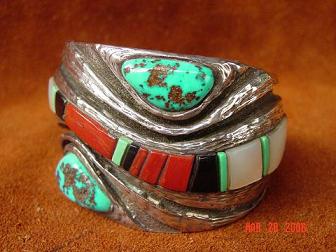
These rings are examples of models built with the wax build up process. Note the texture the build up process produces.


The bezel around the stones was produced with the wax build up
process.
The temperature of the tool and how it is used can produce different finishes on the wax. The model may also be held near an alcohol lamp to smooth the finish although it is difficult to get a smooth uniform finish on a build up model.
BUILD UP TECHNIQUE
The basic tool used in the build up method may consist of dental tools or home made tools. The tools must be designed so that when heated wax will move onto the tool and the melted wax on the tool moves from the tool onto the wax model. The shape is dependant on how much wax you wish to deposit onto the wax model.
Pointed tools can be used to deposit small drops of wax onto the model. Larger flat tools will deposit more wax.
OLD TRADITIONAL METHOD OF WAX BUILD UP

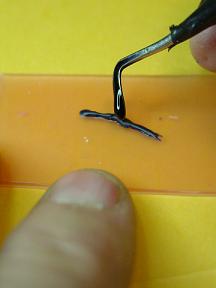
The dental tool shown is heated briefly by an alcohol lamp. Do not over heat. The wax should not burn.

The heated tip of the tool is pressed into the build up wax. Melted wax will flow on to the tip of the tool.
There are several waxes that may be used in the build up process. Most of the buildup waxes are on the brittle side.

These are two types of waxes that may be used in the build up process. Normally build up wax melts and cools very rapidly. The wax is normally hard and brittle. Just about any wax can be used in the build up process. Some will work easier than others. Each artist should experiment with different waxes to develop the technique they want to use.
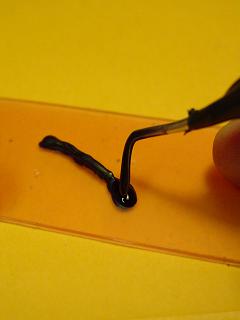
The tool with the wax is then heated slightly. The wax is then drawn on the previous built up wax. The process of heating the tool tip, picking up wax and an reheating then drawing is repeated until the shape of the design is reached. The process is very time consuming.
If the wax and tool are heated to much the wax will flow over the design. If it is not heated enough the wax will not flow on to the model.
The wax that is not part of the design can be scraped away while it is still hot.
Any wax that does not conform to the design can be scraped or cut away. The spot where the overheated wax flowed must be allowed to cool before trying to add more wax. Heated wax will cause a large amount of wax to flow off the tool on to the design.
The model is shaped by continually heating the tool, melting wax, reheating the tool then drawing the wax. The process will create a model that shows lines between each layer of wax. These lines can be smoothed out by heating the tool and re-melting the body of wax.

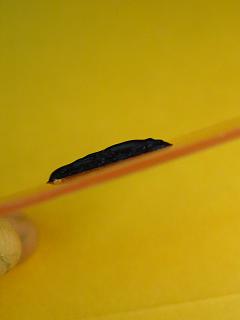
This is what the side of the built up line looks like. The top and sides are very irregular.

The hot wax forms a fillet between the previous wax and the tool.
There are electrically heated tools that help make the build up process easier and much faster.
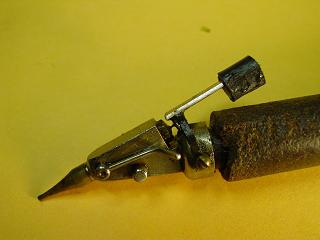
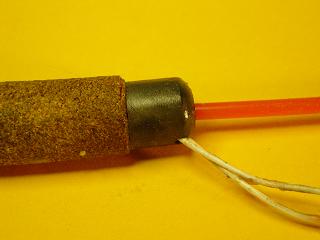
Unfortunately this wax build up tool is no longer manufactured. The front end and the tube of the tool is heated. It has a lever on the front that controls the amount of wax that flows from the tip. The trigger controls the start and stop of the wax flow. Pink sprue wax is placed in the center of the tool.
If you ever find this tool for sale buy it. It is extremely handy when doing wax build up.
This photo shows the use of the discontinued wax tool.

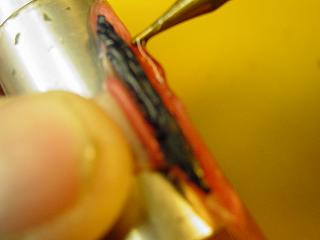
This photo shows an electric pen tip being used to build up wax.
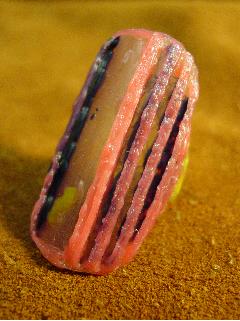
This is what the final build up project looks like. Note the texture. If a smooth texture is desired the model may be held near an alcohol lamp till the wax melts slightly. The surface texture is more at the whim of the tool, alcohol lamp and wax than the artist.
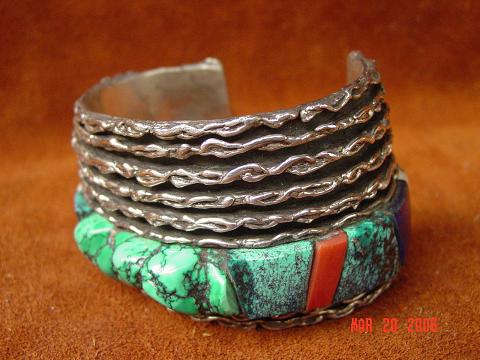
The lines on this bracelet were first built up as described above. Wax was then drawn to the side of the lines.
 A vertical line is built up first.
 Wax is then built up on the side of the lines.
 The inside intersections of the wax must be filled with wax to insure proper casting.
The lines of this bracelet were built up as described above. The texture was then drawn on the top surface of the lines.

Wax dots can be created with a pointed tool. The tool used to make these dots has a small ball end.
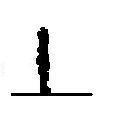
The wax can also be drawn into long rods.
The blue rod is .1 mm thick and the yellow rod is 1.6 mm in diameter.
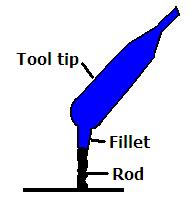
The tip of the wax is covered heated tool is touched to the exiting rod. The tool is then pulled up slightly. This will cause a fillet to form between the wax rod and the tool tip.
Blowing on the wax will speed up the formation of the wax rod.
The diameter of the rod can be varied by the size of the tool, the amount of wax on the tool and the type of wax used.
The first layer of the rod must be melted into the base if the base is carving wax. If this is not done the rod will not be securely fastened to the base carving wax.
And there you have it. A description of a wax build up process. As with most jewelry design an artist can develop differences in technique.
Good Luck
Lee Epperson
leessilver
Latest posts by leessilver (see all)
- CASTING PAPER UNDER CONSTRUCTION - October 30, 2010
- CASTING PAPER UNDER CONSTRUCTION - October 30, 2010
- PAPER NO 4 CREATING LARGE JUMP RINGS - October 15, 2010

{ 5 comments… read them below or add one }
My guess is that both tools would work if one would be patient enough to develop the skill to use them. I think the one that is mounted on the end of a soldering iron would be the most difficult to learn how to use. The distance between the holding hand and the tip is too great which makes it difficult to control accurately to use.
lee
I also found a more traditonal batik wax pen http://www.dickblick.com/products/tjanting-tools-needles/?wmcp=cj&wmcid=feeds&wmckw=64913-1009-2298&AID=10495307&PID=1910599#photos
Would something like this work to apply the wax?
http://www.amazon.com/Encaustic-Flow-Pen-Wax-Batik/dp/B000AIILA8
I use my anti fire scale casting process to prevent fire scale. See my blog on anti firescale vacuum casting.
I oxidize all surfaces of my creations with a product called Winox. I bought a bunch of the stuff before the manufacturer quit making it.
I remove the oxidization from all flat surfaces by use a very well worn wet 600 grit sandpaper mounted on an expanding wheel of my rock polisher.
All the backgrounds of my work are textured so the oxidization is well set in small crevices made by my texturing tool. See my blog on how to create different textures in the wax.
I polish all my items on my 6″ buffing equipment using tripoli and red rouge.
I clean the buffing compound from the pieces using liquid dial soap, slightly warm water and a $5.00 electric toothbrush made by Crest.
I have tried ultra sonic to clean the polishing compound from my work but the process seems to remove the background oxidization.
When you polish the castings, do you tend to use liver of sulphur (or similar) to oxidise the concave surfaces? The technique you use gives a really interesting “natural” feel to the surfaces, but they must be a bugger to polish brightly.
You must log in to post a comment.