Making the slugs for “Family Excursion” sculpture.

by shelbyvision on February 8, 2012

Inspiration for my latest sculpture, “Family Excursion” started with a splinter of mulberry wood I rescued from my firewood pile a couple years ago. I could see that it had great possibilities, so I took it in, and from time to time would sand on it, and try to think about what to use if for. the wood has a feeling of movement and direction to it, with an off-center bend that allows it to rock, but also requires that the weight that’s put on it be balanced correctly. I finally came up with the slugs, because unlike other creatures I could have chosen, slugs are repulsive, but could be made to look cute. I like that contradiction.

The first step to making a slug is figuring out the shape to cut out of the metal. At first I thought the shape was simple enough I could just guess at it. Wrong. It’s actually pretty complicated the way the seams have to meet up at the head end, so I had to resort to making a clay model and using “dip seal” (see this post), and working from there. The first picture shows the clay model. Sorry I didn’t get a picture of the clay model coated with dip seal. Next is the dip seal coating cut at the intended seam lines and removed from the model. The next pictures shows it being spread out some. The dip seal pattern is then spread out as flat as possible on a sheet of paper and traced with pencil. This can be scanned and with computer and printer made any size desired.

01 02 03 04

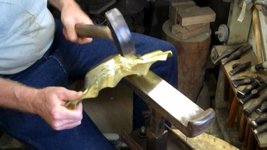
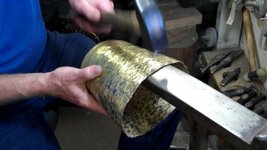
After the blank is cut out and annealed, the antennae are formed over a stake, then the back is pushed out from inside on a sand bag.Next, the curvature of the body is formed over a stake with a raising hammer, then the belly curve on another stake with a planishing hammer.

05 06 07 08 09

Next is closing up the seams on the antennae and rounding them out. Then a view of the piece at that stage, and the seams having just been silver-soldered.

10 11 12

The slug was annealed again, and the main seam closed up as much as possible, which in this case was only the back part. The picture shows it after silver-soldering. It had to be annealed again to get the rest of the seam closed up. Then we see it with the entire seam silver-soldered, and pickled, and then with all the final planishing and polishing.

13 14 15

And finally, the finished piece, three views. The slugs are attached with stainless steel machine screws, two for each one.

16 17 18

{ 4 comments }

I haven’t posted here for a long, long time, been way too busy. Got an order from Artful Home for 140 bird ornaments, took me by surprise, and I really wasn’t ready, so I’ve been very busy. I did this piece, “Yes Man”, back during the summer. I took video of the entire process and edited it down to about an hour, showing how the piece was made, from start to finish. Shown here are a few stills from the video, and pictures of the completed piece. To see the video, go here: http://vimeo.com/29540364.

01 02 03 04 YesMan1 YesMan2

{ 5 comments }

Homemade Immersion Heater for Large Pickle Tank

July 12, 2011

I have always preferred to have my pickle solution hot, or at least warm; it works so much faster, especially for dissolving flux. Since many of the pieces I make are rather large, I have sometimes had to settle for cold pickle, since the crock-pot was too small. Recently my crock-pot developed a leak, so […]

Read the full article →

Making Tea Wrex, Part Three

June 24, 2011

This is the final installment, continued from Part One and Part Two. The final parts to make are the two little arms. Originally, when I hadn’t gotten any further than the clay model, I thought I would use repoussé techniques to make the arms simply embossed on the surface. I soon came to realize that […]

Read the full article →

Making Tea Wrex, Part Two

June 23, 2011

Part Two of Three. See Part One. The next step is the belly portion of Tea Wrex, which is the actual vessel of the teapot. The tongue, which is the spout, is part of it. I wanted the part that would be used for holding liquid and pouring to be one piece with no seams. […]

Read the full article →

Making Tea Wrex, Part One

June 22, 2011

Because this was such a big project, and there are so many pictures, I’ve decided to do it it three parts, so without further ado, I will begin with Part One. This started a couple years ago when someone at a gallery asked me if I make teapots. I never had made a teapot, so […]

Read the full article →

“Tea Wrex” hammer-formed copper teapot

June 19, 2011

Made from 10 gauge copper sheet. 120 hours of labor over six months. I will be posting about the process in a week or two, but like a proud father, I just had to show off with some pictures right away.

Read the full article →

New Life for an Old Hammer

June 11, 2011

I have wanted a new raising hammer for quite a while. My old one, which I got as a student about 40 years ago, is not quite as heavy as I would like, and it is made of cast iron. The surface gets pitted (see first picture) after a little use, so I’m constantly having […]

Read the full article →

Puzzle Necklace, made from brass scraps

May 30, 2011

I have accumulated a lot of scraps of brass over the years, the pieces left over after cutting out the shapes that I used for my work. I have always thought I could put them to use for something, but never had any good ideas for them. Just recently I had the time to do […]

Read the full article →

I remodeled my online Metal Art Gallery. Please take a look.

May 16, 2011

After several weeks of off-and-on tedious work, I now have the remodeled version of my metal art gallery online. I got rid of the javascript, which made the gallery take forever to load, and went with good old-fashioned html. I tried to make navigation of it as easy as possible. I hope I succeeded. I […]

Read the full article →

WordPress Admin