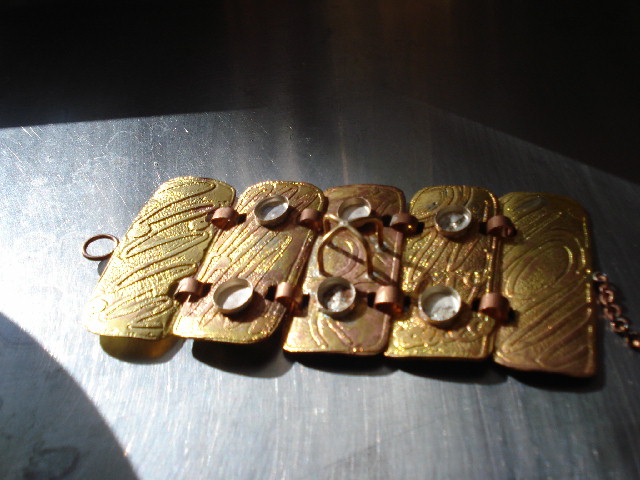
In my last post, I told of Maria from Venesuela who is constructing a bronze bracelet, etched, with stones. The middle stone of the middle plate she wants to be set in prongs in contrast to the other bezel set stones. Following is a picture of the bracelet in progress. Notice the prong shaped ‘cup’ used in the center so she would be able to properly align and center it.
This weeks challange comes from Chrissy, a local gal, who enjoys making or modifying rings. Chrissy has been ‘beading’ for a long time and is now polishing up her new found fabrication skills aimed at making more substantial jewelry (no offense to all you beaders out there).
Chrissy acquired a Sterling ring with a nice navette shaped blue Labadorite. Unfortunately, it had a pretty wimpy single 2.5×1.25 half round shank so she wanted to jazz it up a bit.
She had to completely dissemble the ring which required she remove the stone, take off the old shank, add a new shank and reset the stone. This may not seem like a difficult task for the more experience out there, but I bet those who have only been doing this for a year or so might like to know what/how she did it!
We removed the stone by carefully inserting a thin knive point between the stone and bezel and then working the blade around both sides of the stone to move it back from the stone. The delicate end points were a bit dicey but by careful use of the knife point, they opened fairly easily and she removed the stone. Next she fluxed the piece, first with Pripps to preclude firescale then Batterns on the join to facilitate separation. She held the ring upside down, holding the old shank in a third hand. With an application of flame using a #1 Smith acty/air tip the bezel cup quickly fell away. She cleaned up the bezel cup and then created a new shank consisting of three by-passes of 2.5×1.25 half round and three small radomly placed balls soldered between the by-passes. This she soldered onto the bottom of the bezel cup.
Finally, came the time to reset the stone. At this point the the challange appeared. The stone would not fit back into the bezel. [Have you ever noticed when you make a bezel and solder it to a back plate then when you try to put in the stone it never seems to fit? Well, thats usually the result of making a slightly coned bezel when you first wrap it around the stone. Be sure to always make the bezel wire perfectly perpendicular and fit the stone from both sides (from the top and bottom) before soldering it on.] In this case, she was using the old bezel from which we removed the stone….who knows why it wouldn’t go back in but everything we do is subject to the mysterious Laws of Murphy!!
The challange: Fit the stone back into the old bezel. This is where many budding jewelers, and some who have been at it for some time as well, come up short. In Chrissy’s case however, one of the first things I taught her was how to cabochon so she is very familiar with the grinder/polishing machine. We inspected the stone and bezel and decided the problem was on the points (which had understandably chipped a bit during the removal process anyway). I suggested she lightly smooth the points at the girdle line but stay away from the shoulder’s. She did that and, walla, the stone fit perfectly.
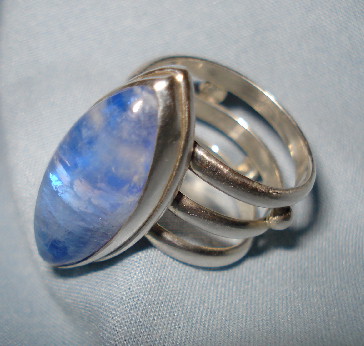
The moral of this story is; if you want to be a well rounded jeweler, don’t pass up the opportunity to get some experience cutting stones. You don’t have to become a master cutter but you should know the character and idiocyncracies of the stones you intend to work with AND how to deal with them. Following are pictures of the finished ring.

coralnut
Latest posts by coralnut (see all)
- Value of Black Coral - March 3, 2011
- How to Work Black Coral - January 1, 2009
- Black Coral Revisited - December 29, 2008

{ 1 comment… read it below or add one }
As always, thanks for the excellent explanations – the pictures really helped too! They are lucky to have you for a teacher.
You must log in to post a comment.