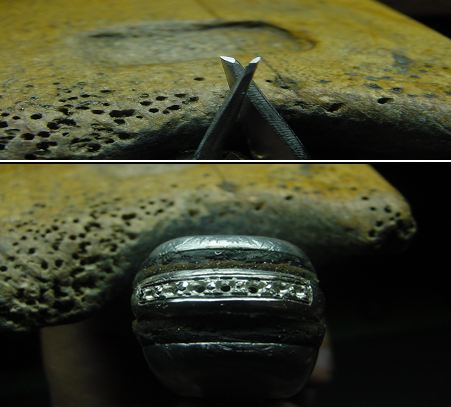
The relationship between “Rough-Cutting and “Bright-Cutting” is so close. One aspect of cutting, depends solely upon the other, it’s an epitome of a ‘symbiotic relationship’.
Symbiotic Relationship between Rough-Cutting and Bright-Cutting
A pre-requisite to the final stages of “Bright-Cutting”.
The most basic and fundamental procedure in diamond setting is to rough-cut. Nothing can compare to the nuances of actual hand carving in gold/platinum. This most important and valuable setting process enables the setter to validate his belief that ‘rough-cutting’ is so necessary to the final ‘bright-cutting’. Each process cannot be made possible without the other, hence it is a ‘symbiotic relationship’.

What tools are necessary? The list is very minimal, but each holds a distinct use in its own right, the Onglette Graver #1, and Onglette #2. What can be simple than these two items at your disposal? But using these two making all so relevant to each. In my next few pictures, you, the reader can see the design taking shape. This ‘cutting’ step cannot be achieved by just “Bright Cutting” with an Onglette graver #2. After all of the holes are drilled and opened with a bur of your choice, to accommodate the diamond.
This ‘rough-cutting’ should now start.
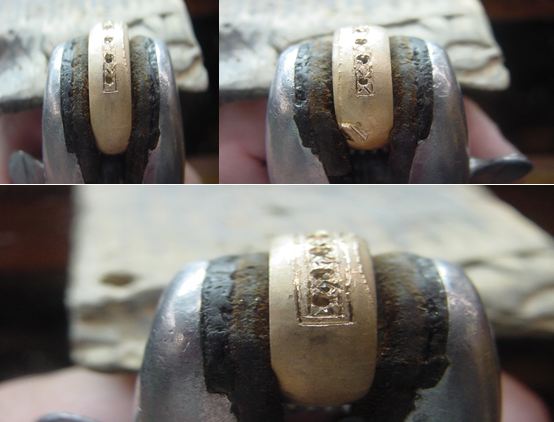
Where must the first cut be initiated? In my opinion, it should be started at a position at least one diamond width further along the shank from the first hole being drilled. This is to ensure the placement of the two beads and subsequently any additional cutting prior to any ‘bead-raising’ area. This can be seen in the colour pictures taken on the Tiffany styled-wedding band.
Now we have ascertained the placement, now arrives what depth should the graver be used at? The preferred depth should be taken in at least three levels of cutting, each stage should be at least a ‘quarter a graver depth’, or so deeper that the first. My first line of gradual cutting allows me to ascertain the depth for the next two or three cuts.
It is almost like a building foundation in this execution of line drawings. I prefer to keep my graver at a vertical position and no ‘side-angled’ cutting is to take place.
My intention is to cut deep, this is to be used with my separate “Bright-Cutting” Onglette “Right-Sided”- shaped graver.
At every consecutive deeper cut, I will maintain a ‘vertical’ angle of the graver, then allowing sections of metal to be used for ‘space allocation’ for the bead at a later stage of cuttingIn the following pictures you can see little ‘triangles’ of cutting. These are the sections of metal where the bead is to be formed and then raised over the diamond.
In between the holes allocated for the diamonds is an area that is left alone for some bright-cut designs. With my Flat Graver #39 I will, prior to setting of any stone permit my graver to make little rectangle shaped cutting in between the holes for the diamonds.
This will help me to create a little ornamental design that enhances the gold as its rather difficult after the stones are in.
There will be at times a situation where a Flat graver can be used, this is specifically in the cutting in between the two diamond hole areas. Only then you will achieve clean and exacting cutting. Now that you have finished using your rough-cutting graver, we can now use the “Bright-Cutting” process. I prefer to only cut exactly where the line-cutter was used and no other place.you are only now enhancing the original cutting grooves you made prior to this process.

In my previous essays, or articles on this subject I gave detailed explanations of how to “Bright-Cut”, but this might be redundant in explaining this again. But one last piece of information, follow the original Graver cutting with your Onglette graver #1 or #2.
Not to mention keeping your gravers sharp and polished at all times
Gerry Lewy!
Gerry Lewy
Latest posts by Gerry Lewy (see all)
- Bead Setting, Bright Cutting, Pave aka Cut ‘n Bead - December 26, 2012
- Symbiotic Relationship between Rough-Cutting and Bright-Cutting - September 8, 2012
- Princess Diamond, 4 – Claw Setting - August 27, 2012

{ 3 comments… read them below or add one }
Hi Guy
Thanks for your comments! I got hoards of more essays coming with in the weeks to come, for a total of about 50 essays or 200 pages of notes!!!!
I’m using an old Sony 2.7 mg’s.camera, its about 8+ years old. It has a closeup lens on it and can get to about 1.5 inches from the ring to the lens!
I use this great cumbersome heavy camera all the time. What I do is to take 4-5 photo’s of one item, and pick the one I like, simple as that!..Gerry
Hi Gerry!
Love your blogs! I once attended a Show Me Conference in Cincinnati Ohio with your self and Bradley Simon! Out of curiosity what kind of camera set up do you use for your blog images? They are pretty clean and crisp!
Gerry, i can not express my gratitude enough for you sharing your skills and insights on top of that you have great writings skills.
I read on Ganoksin you get a lot of critics from ‘friends’ about you sharing your knowledge , they don’t understand that sharing skills make sure the craft will expand and survive.
Again my deepest appreciation for your efforts, I am sure that there are a lot more than the 110 you mentioned who share that feeling!
Kind regards
Peter
Spain